Mumford & Sons – Babel

Babelcoverart

The purpose of this video is really to promote the band because of the way it shows each member within, playing certain instruments they had to do with the song.

“Babel debuted at number one on the UK Albums Chart and the US Billboard 200. It became the fastest selling album of 2012 in the UK, selling over 158,000 copies in its first week, and was the biggest selling debut of any album in 2012 in the US, selling 600,000 in its first week, and over a million worldwide.” – Wikipedia

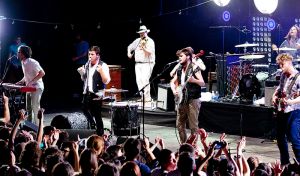
Mumford_&_Sons_in_Teatro_Romano_Verona_2012

Screen Shot 2013-10-14 at 14.00.07

Screen Shot 2013-10-14 at 14.02.18

I have chosen this music video because it’s easily makable to swede. In the video, the band members ‘Mumford & Sons’ are just playing instruments whilst the camera is in a constant pan from left to right. To make the video, all we would have to do is have characters playing instruments, standing up. You wouldn’t have to actually play the actual song correctly, you would just have to look like you are playing that instrument. The video is in black & white so this would be easy to do, all would have to do is add an effect after filming the video in colour.
For location, we could either us a field, big hall or the studio in the media block.

Purpose Of Music Videos 14/10/13

The purpose of a music video is to either promote the band, a product, a band, an album, a lifestyle or an image, depending on whats happening, people that watch it, who like that particular band or who’s in the video, they will buy what is being shown, just because of that certain celebrity. Some videos tell a story either to do with there life or it could be in the style of the music itself.

When a song is played on the radio, the artist and the record company receive royalties. Meaning, if you add a visual element, you will also receive royalties every time time it is played on the TV as well. Equals more Income.

The more times a music video/song is played, the more likely more people will hear it, meaning more people will buy it, making it more popular. So the more you publicise the song and video the more chance people are going to see it. the best ways to do this is either play it on the radio, upload a music or lyric video on to websites like YouTube or Vimeo or put it on iTunes.

Object Effects Sound

The ‘Object Effects’ are the sounds re-created from the objects used within the scene. An example for this video would be the weapons; bow and arrows and swords and also when the characters actually get hit by that particular weapon and the ladders bashing against the wall. In our swede, the object effect sounds we re-created was the chimes of the pocket watch.

Foley Sound

Foley, this is made to replace sounds recorded at the time of set whilst filming to make it sound much better and/or clearer. The ‘Foley Artist’ is the one that creates these sounds for the film or television programme. There job is to be as creative as they can to make the sound, sound completely realistic to make the people watching it, believe that it’s actually within the film. Foley is mostly used when re-creating the sound of; footsteps, clothing like leather rubbing as the character is moving, objects like doors opening and many many more different examples. In our video, ‘For A Few Dollars More’, we re-created the sounds of footsteps, clothing being rustled and the gun being placed back into the holster.

Final Edit of our Swede For Few Dollar More, Sound 10/10/13

For this project, we had to take our swede that we made and create the sound ourselves using what ever we could find to try and make the sounds, sound exactly like they did in the original scene that we sweded. To do this we got a sound-pack and set it all up into one of the macs in the edit suite. Out swede that we did was a scene from the film ‘For a Few Dollars More’. Before we started re doing the sound effects we decided to watch the original back so we know which sounds to re-create. Right at the start of the scene, one of the characters walks out of a building. As he is walking, you can hear his shoes making a noise sort if like a ‘ding’ every-time he took a step. We tried to find different ways of re-creating this sounds but we then managed to find a suitable thing to do which was close enough. To re-create this sound we got a couple coins and put them in our hands. We then shook them so they clashed together to make a ‘ching’ noise.
The next sound we had to re-create was when one of the characters put his gun into his holster. We did this by having the microphone up close to pocket, and me putting my hand into my pocket, making a noise similar to the one in the original scene. When we got the sound we had to turn up the gain by about +10 so we could clearly hear it.
The next sound we had to do was a voice-over for what one of the characters says. We did this by literally have Henry speak into the microphone the script because he was the actor in the swede we did before.
The next noise we did was when Henry was chomping whilst having a standoff with Josh. To do this we just had Henry to chew some gum close to the microphone. We also turned up the gain by about +10 so we could just about hear it.
The next sound we re-created was when in the scene, one of the characters slowly moves his fingers as he slowly moves up to grab his gun. To add to this, we decided to the noise of his fingers clicking as he moved them. We did this by having my finger up close to the microphone, and I clicked some of my fingers. When we had the sound clips, we either sped them up or shorted them, so it sounds more realistic then just a repeated click.
The next sound was when one of the characters (Josh) had to get his stop watch (earphones) out of his pocket. To re-create this sound we put the microphone up close to henrys hoody and had him ruffle it to make a certain noise that it did in the original scene. After recording it you couldn’t hear it very well so we turned up the gain on this sound as well to about +10.
In the background, we decided to add some wind, so I got the microphone and blew into it making a noise similar to what wind sounds like. We then cut it down and then repeated it so it was a constant sound within the background. I did make the wind noise throughout the whole scene but you could people in the background or there was the odd points where it paused when I actually had to breath.

Sound competency 02/10/13

For our lesson we had to make a recorded guide on how to set up a sound-pack onto Premiere Pro and record voice-overs telling you what to do step by step. To do this, we needed to go to the hatch and book out a cam-corder, USB lead, sound-pack and microphone.
We then went into the edit suite and onto a computer. First of all we decided to film us unpacking the contents of the bag that had all the wires and the sound-pack, then record us setting it up, plugging in the microphone and plugging in the sound-pack. This meant we had some clips to start off with to start doing some voice-overs, whilst we had it all set up. We had to check if the microphone was being picked and wasn’t coming from the computer so to do this we had to click on the Apple symbol in the top left corner, then System settings, then sound, then click on ‘Line In’.
Once this was all setup, we was ready to go. We decided to record the voice-overs of what we had already filmed so they was out the way and finished. We then needed to record us packing the equipment away so we decided to do all that then plug it all back in to record our voice. After we recorded the clips and the voice-overs we got stuck into editing it together. We put the videos clips on first so we had a foundation lets say, then we put the voice-overs, over the top so we knew which order to say the things we needed to say. After we did all the recording, we made an intro title and some credits.